
Introduction
My Approvals provides a central place to view service requests that require your approval or for which you have already provided an approval decision. It displays requests assigned to you based on your membership in a Service Request Approval Team (SRAT).
When a service request is submitted under a problem category that requires approval, the system routes it to the configured approval team. If you are a member of that team, the request appears in your My Approvals section for review and action.
Each request card displays important information to help you identify and review the request, including:
-
Request Details: Subject and request ID.
-
Requester Information: Name of the person who submitted the request.
-
Department and Company: The department and company associated with the request.
-
Submission Date: When the request was submitted.
-
Approval Requirement: The approval criteria applicable to the request.
-
Approval Status: The current status of the request's approval process.
-
Authority Board: The authority or approval details associated with the request.
-
Last Updated: The date and time of the most recent update.
These features help approvers track pending requests, review approval details, and monitor decisions from one place.
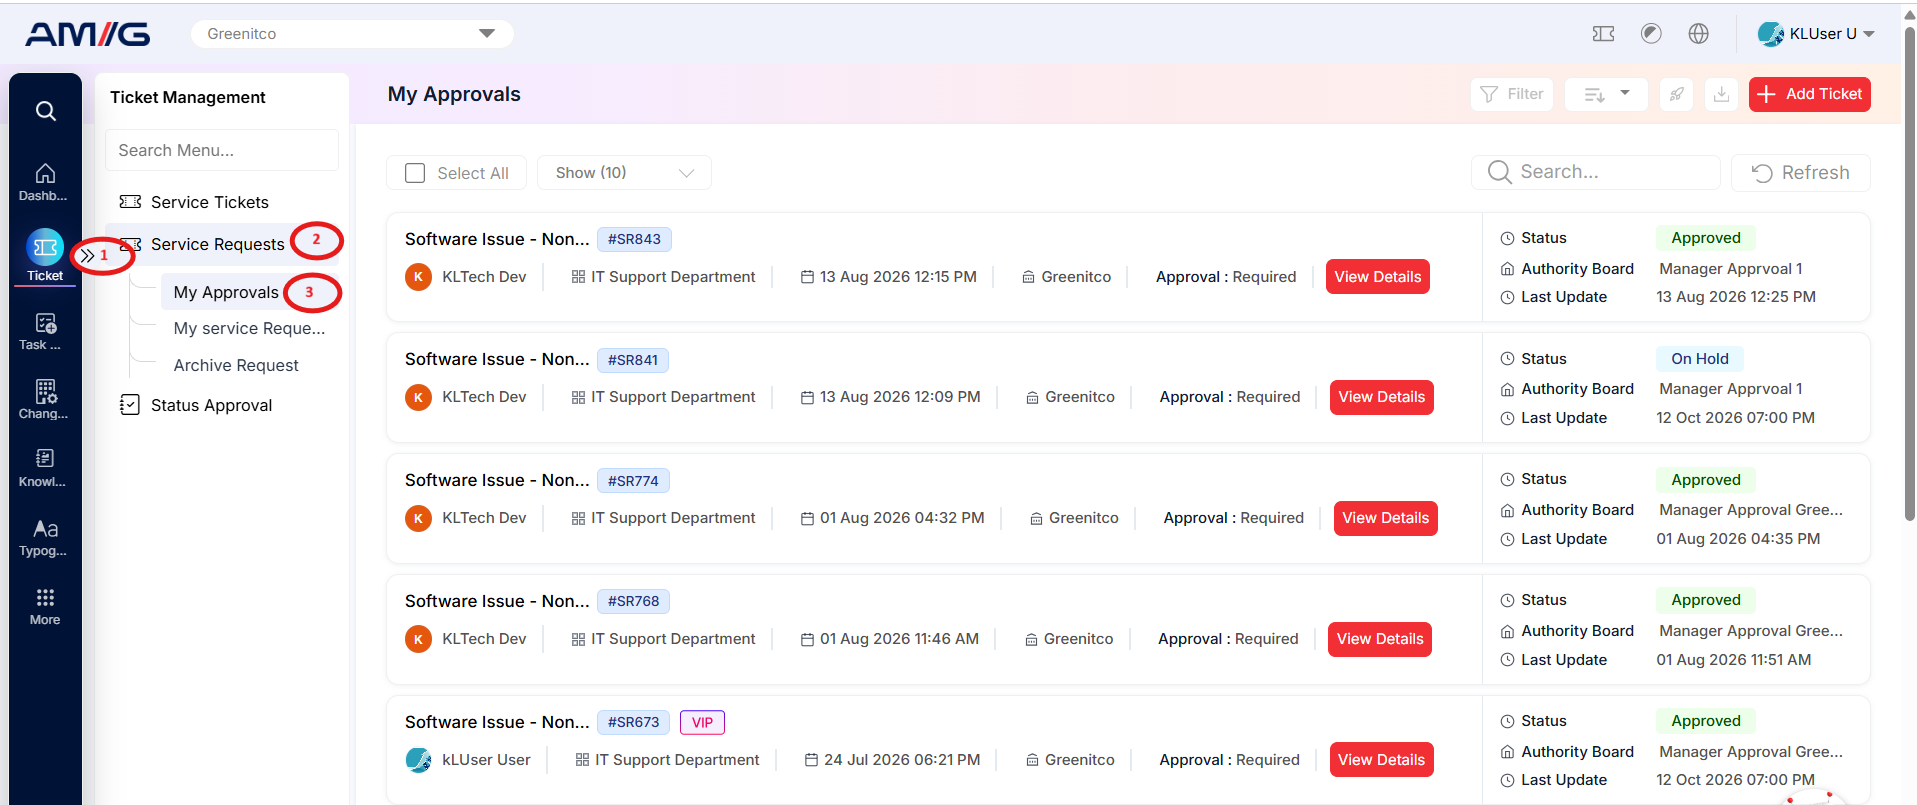
Navigation Path: Sidebar > Ticket > Service Request > My Approvals
Viewing My Approvals
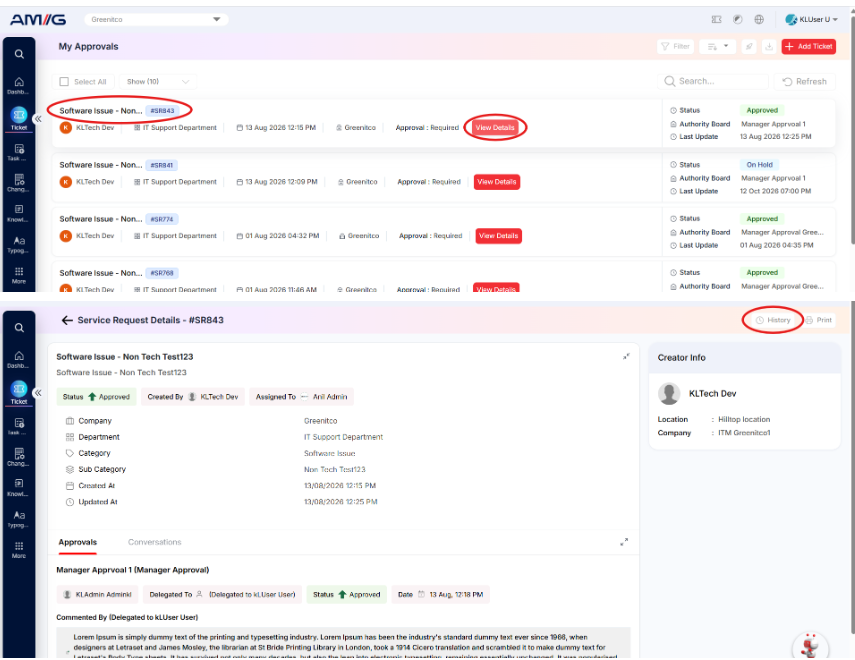
Step 1: Open Sidebar > Ticket > Service Request > My Approvals. The page displays the approval requests available to your account.
Step 2: Review the request title and ID, requester, department, date/time, company, and approval requirement on each card.
Step 3: Check the Status, Authority Board, and Last Update panel on the right to understand the current approval position.
Step 4: Use Search, Filter, Refresh, the page-size selector, or the pagination controls to locate a request. Select individual requests or use Select All where available.
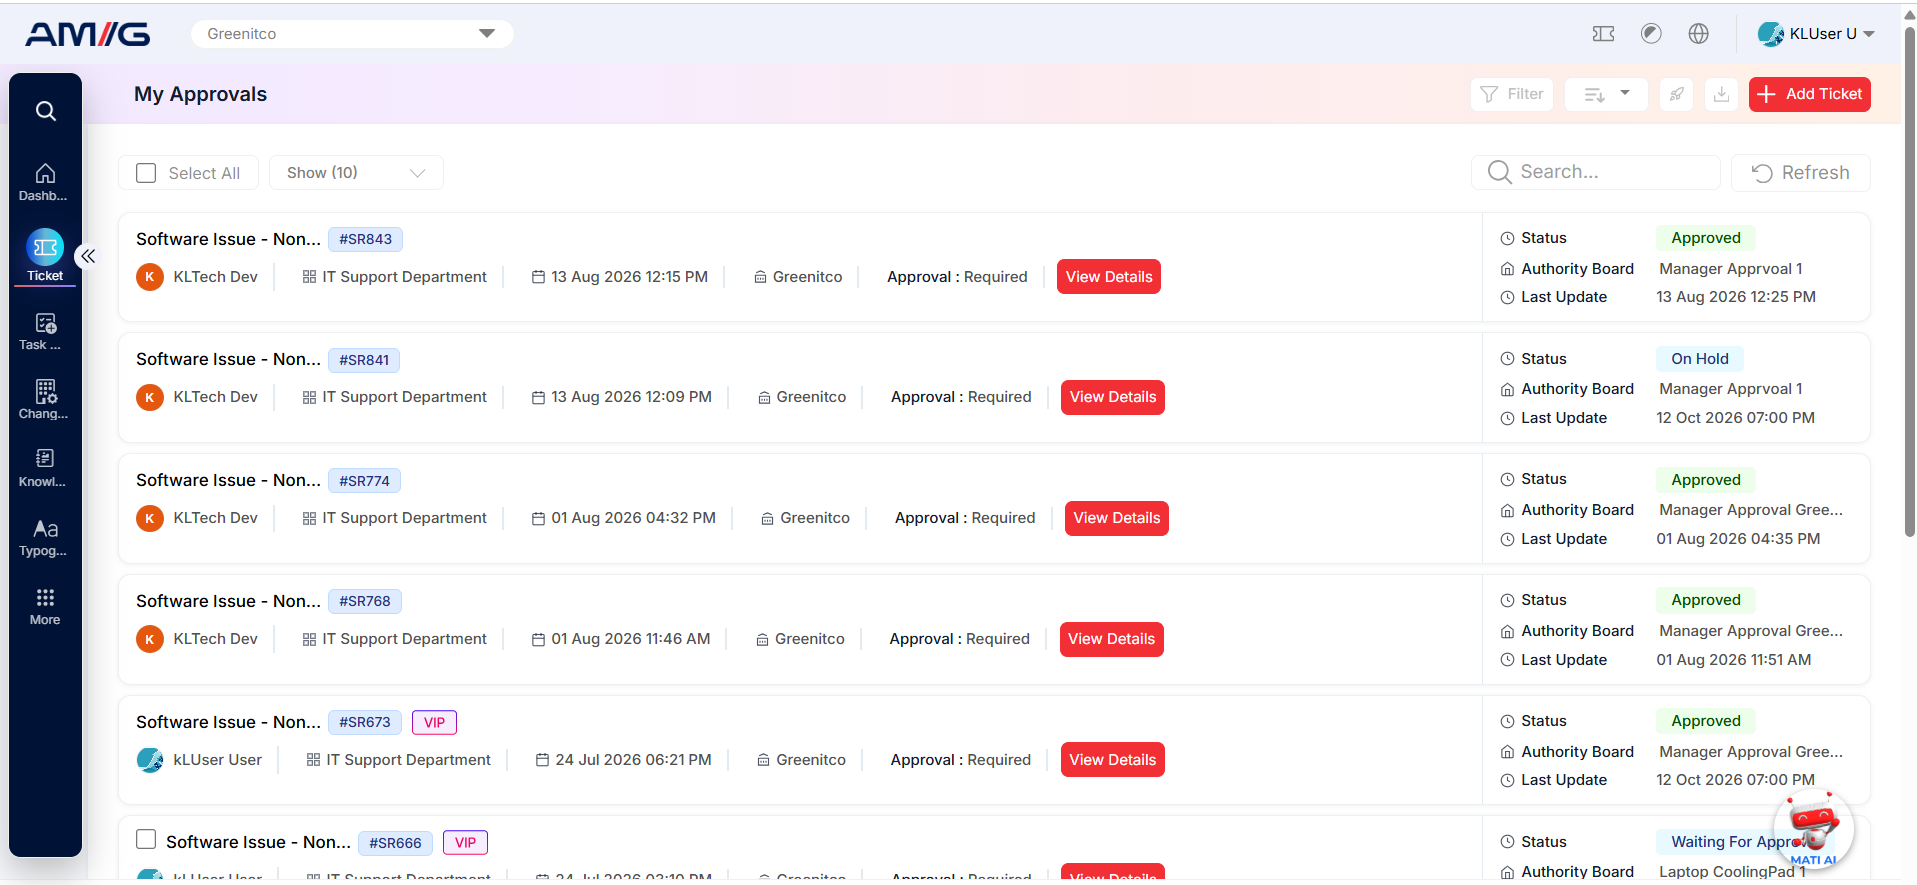
Figure: My Approvals list
Table: My Approvals card details
| Item | Description |
|---|---|
| Request subject and ID | Identifies the service request and its request number. |
| Requester / department | Shows who submitted the request and the associated department. |
| Submission date / company | Shows when the request was created and the company associated with it. |
| Approval requirement | Indicates whether approval is required for the request. |
| Status | Shows the current request status, such as Approved or Waiting for Approval. |
| Authority Board | Shows the authority board or approval group currently associated with the request. |
| Last Update | Shows the most recent recorded update time. |
| View Details | Opens the selected request details, including its approval information. |
Reviewing Request Details
Step 1: Click View Details on the required request card.
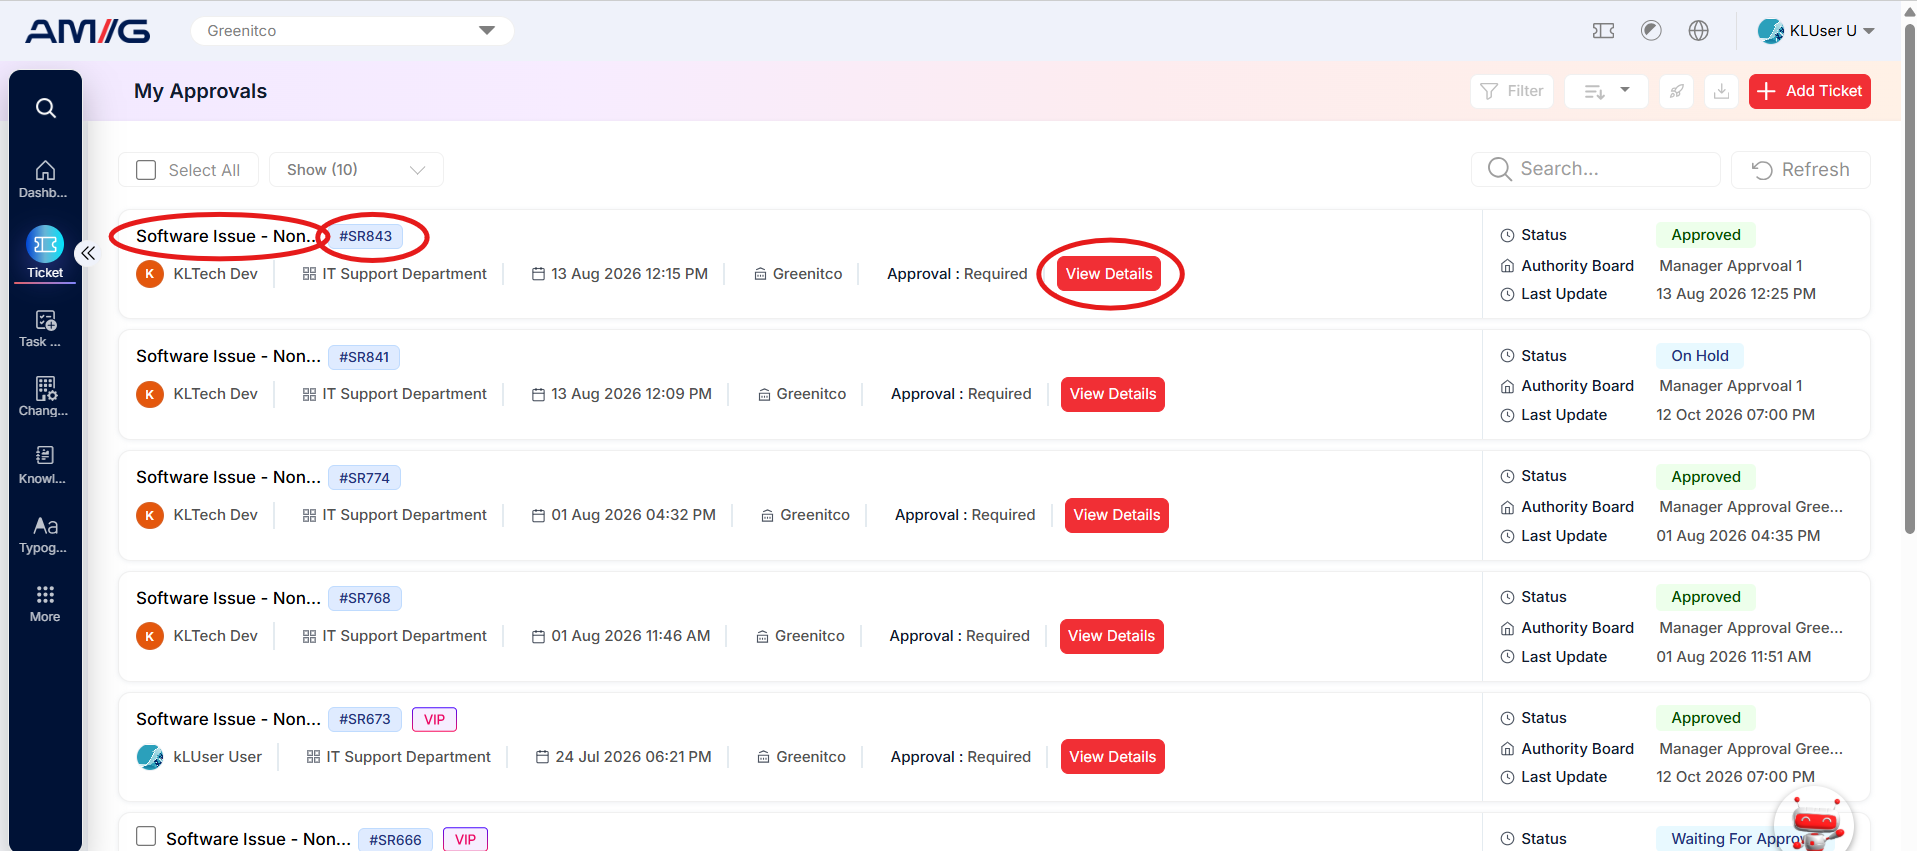 Step 2: Review the request subject, status, creator, company, department, category, and creation/update timestamps. Select View More Information to inspect additional fields where available.
Step 3: In the Approvals tab, review each approval entry, including the approver, decision status, decision date, elapsed days, and comments.
Step 4: Select Conversations to review the conversation thread associated with the request.
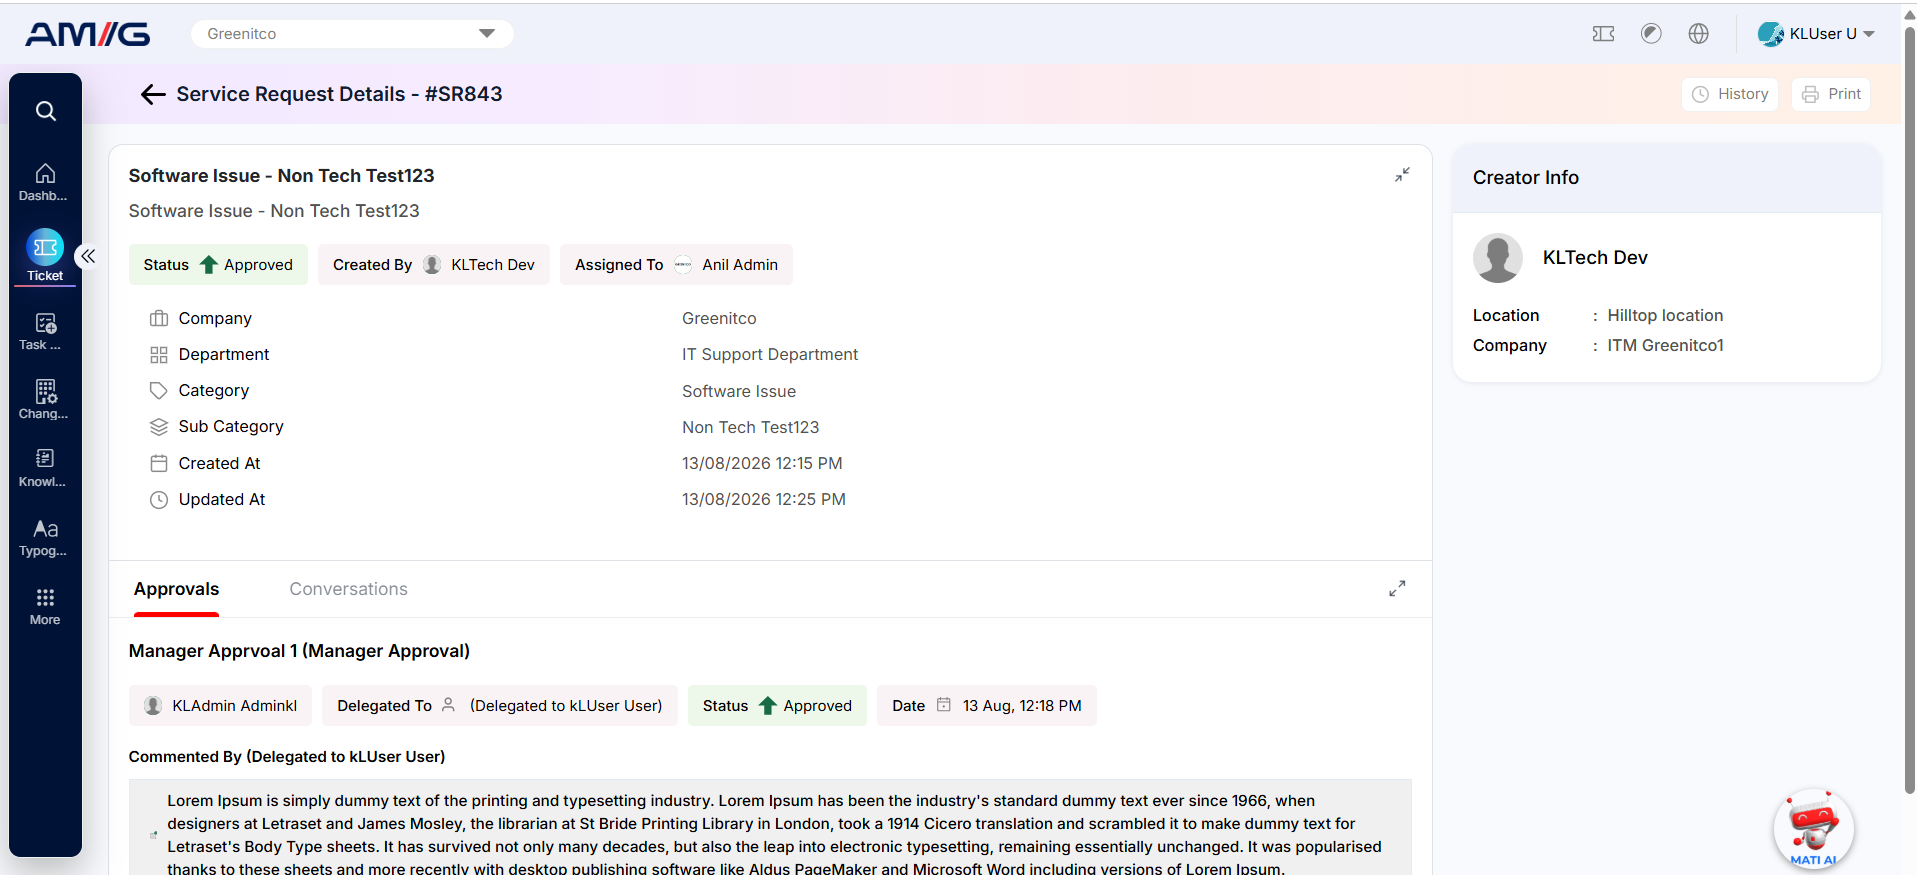
Figure: Service Request details and approvals
Table: Service Request details page areas
| Detail / Area | Description |
|---|---|
| Request summary | Displays the subject, current status, creator, company, department, category, and record dates. |
| Creator Info | Shows the request creator’s name, location, email, and company. |
| View More Information | Expands or opens additional request fields where available. |
| Approvals tab | Lists approval records, including the approver, status, date, duration, and comments. It shows who approved or reviewed the request and any comments they added. |
| Conversations tab | Displays the conversation information associated with the request. |
| Service Ticket / History / Print / View Form | Service Ticket: Opens the ticket created after the request is approved. History: Displays the request's history timeline. Print: Prints the request details for reference. View Form: Displays the dynamic form submitted when the request was created. |
Recording an Approval Decision
After reviewing a request, record your decision. You can decide on one request or select several requests and decide on them together.
Step 1: Select the checkboxes for the requests to process. Use the list’s selection controls to choose the required requests.
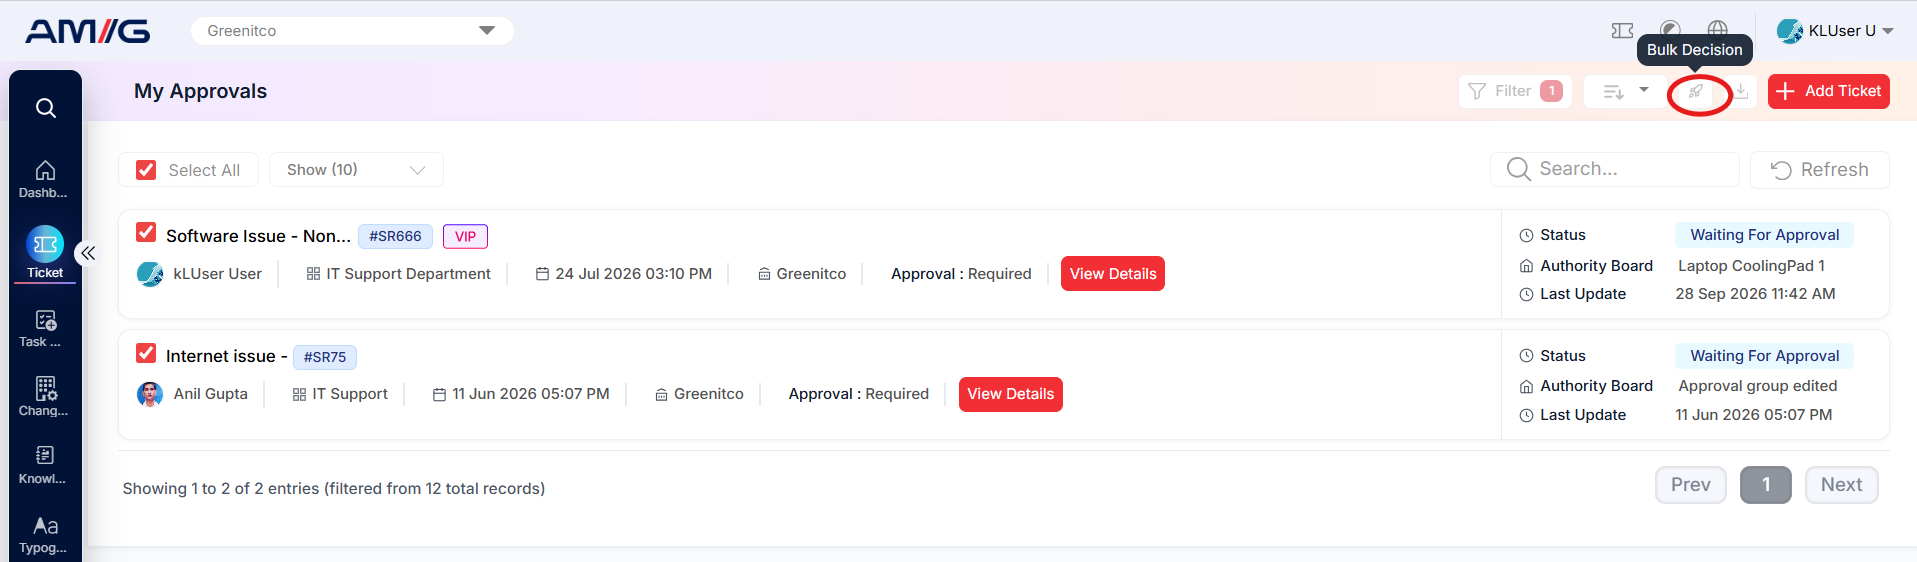
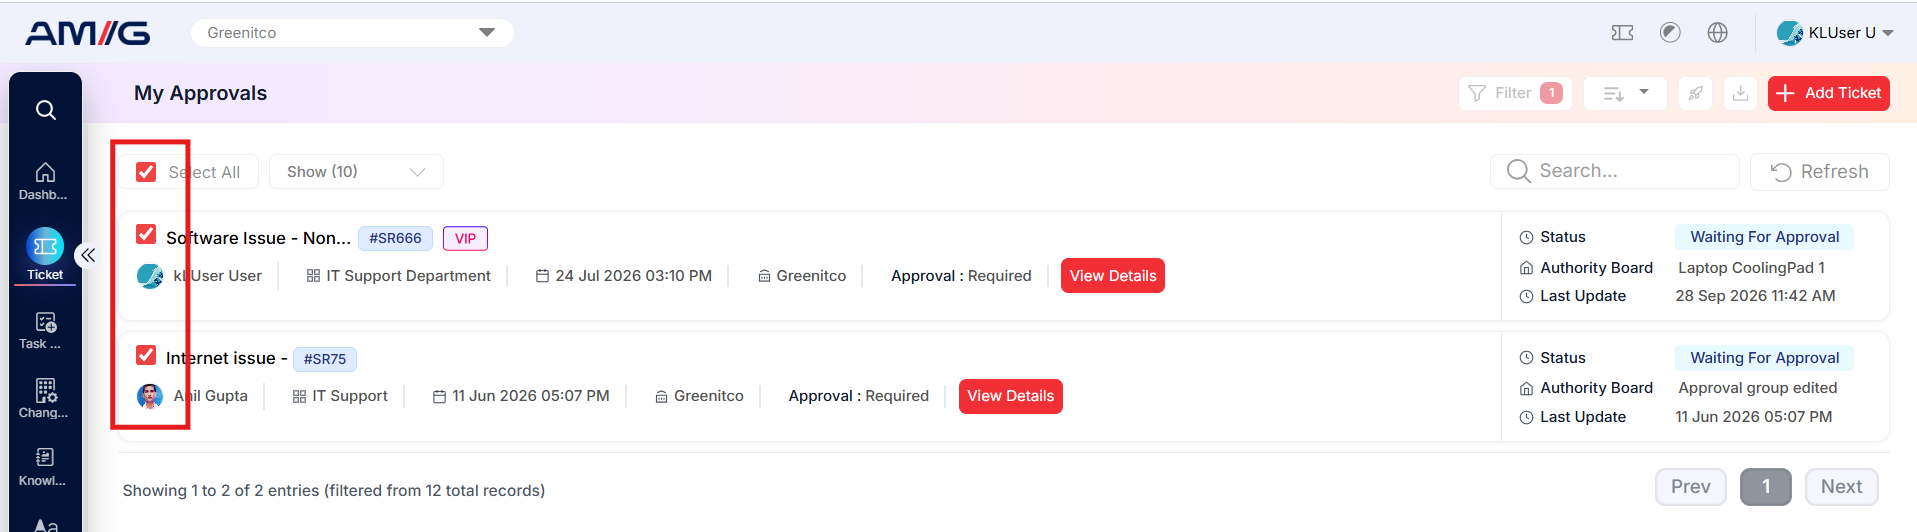 Step 2: Open the bulk-decision action. Confirm that the displayed approval IDs match the requests you intend to process.
 Step 3: Select the required status and enter a comment. Both status and comments are required on the displayed Bulk Decision form.
Step 4: Click Submit to apply the decision to the selected requests. Click Close to exit without submitting.
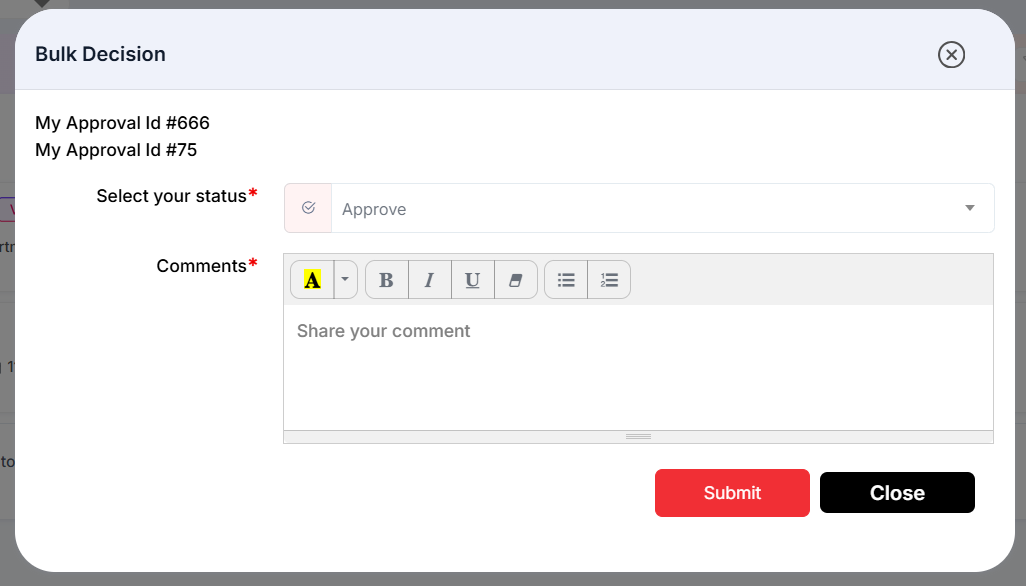
Figure: Bulk Decision dialog
Table: Bulk Decision controls
| Field / Control | Description |
|---|---|
| Selected approval IDs | Lists the approval/request IDs included in the bulk decision. Confirm these before submitting. |
| Select your status* | Choose the decision status, such as Approve where available. |
| Comments* | Enter the required comment explaining the decision. |
| Submit / Close | Submit the bulk decision or close the dialog. |
Important: Approve or reject a request only after reviewing its details, attachments and any comments from earlier approvers. Some decision options may not be available for every request.
Viewing Request History
Step 1: From the request details page, click History.
 Step 2: Review the timeline from oldest to newest or scroll through the available events. Each event can show a timestamp, the person involved, the approval response or comment, and the associated action.
Step 3: Use the history to understand when a decision was recorded and whether comments were added to the request.
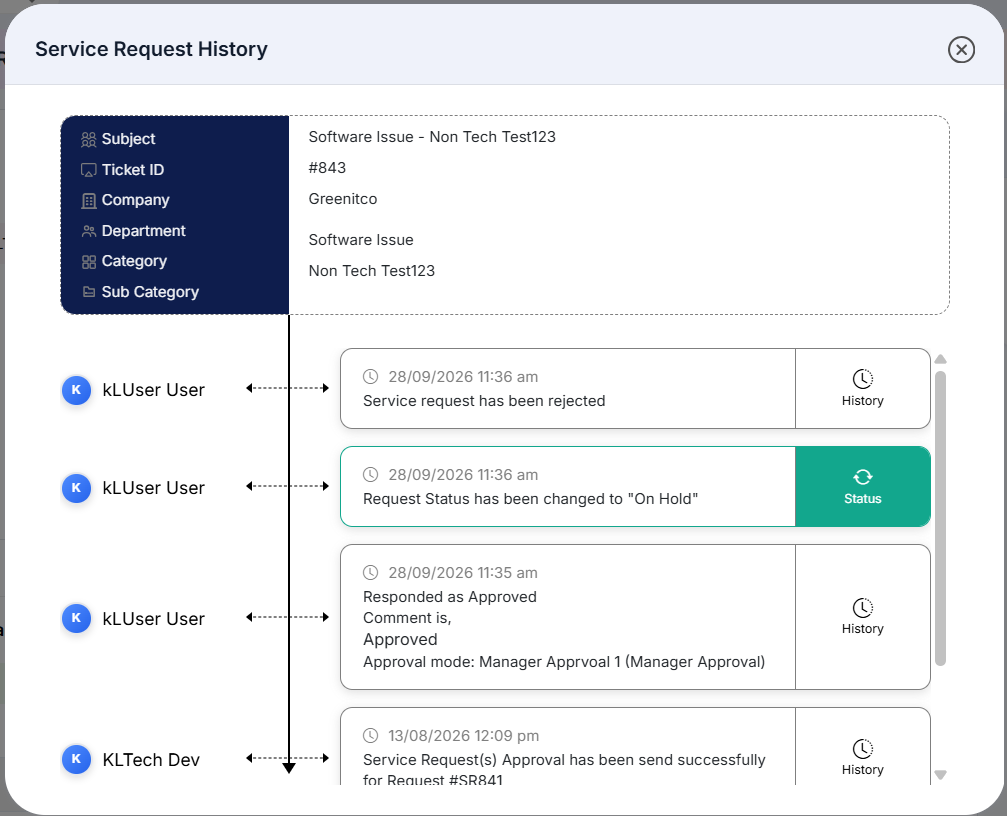
Figure: Service Request History timeline
Table: Service Request History details
| Item | Description |
|---|---|
| Request summary | Shows the subject, ticket/request ID, company, department, and category. |
| Timestamp | Date and time of the recorded event. |
| Person / event | Identifies the user and action, such as an approval response or a comment. |
| Comment | Shows the comment associated with the event when one was recorded. |
| Approval information | May include approval mode and the number of days recorded for a decision. |
To narrow the list of approval requests, use Filter as described in the Filtering Service Requests section.
Sorting My Approvals
Step 1: Open the sorting field menu on the service-request list.
Step 2: Select the field to sort by. The menu shown includes By Request Tag, By Requester, By Status, By SR Team, By Department, By Created On, By Updated On
Step 3: Use the sort direction control, where available, to change the ordering.
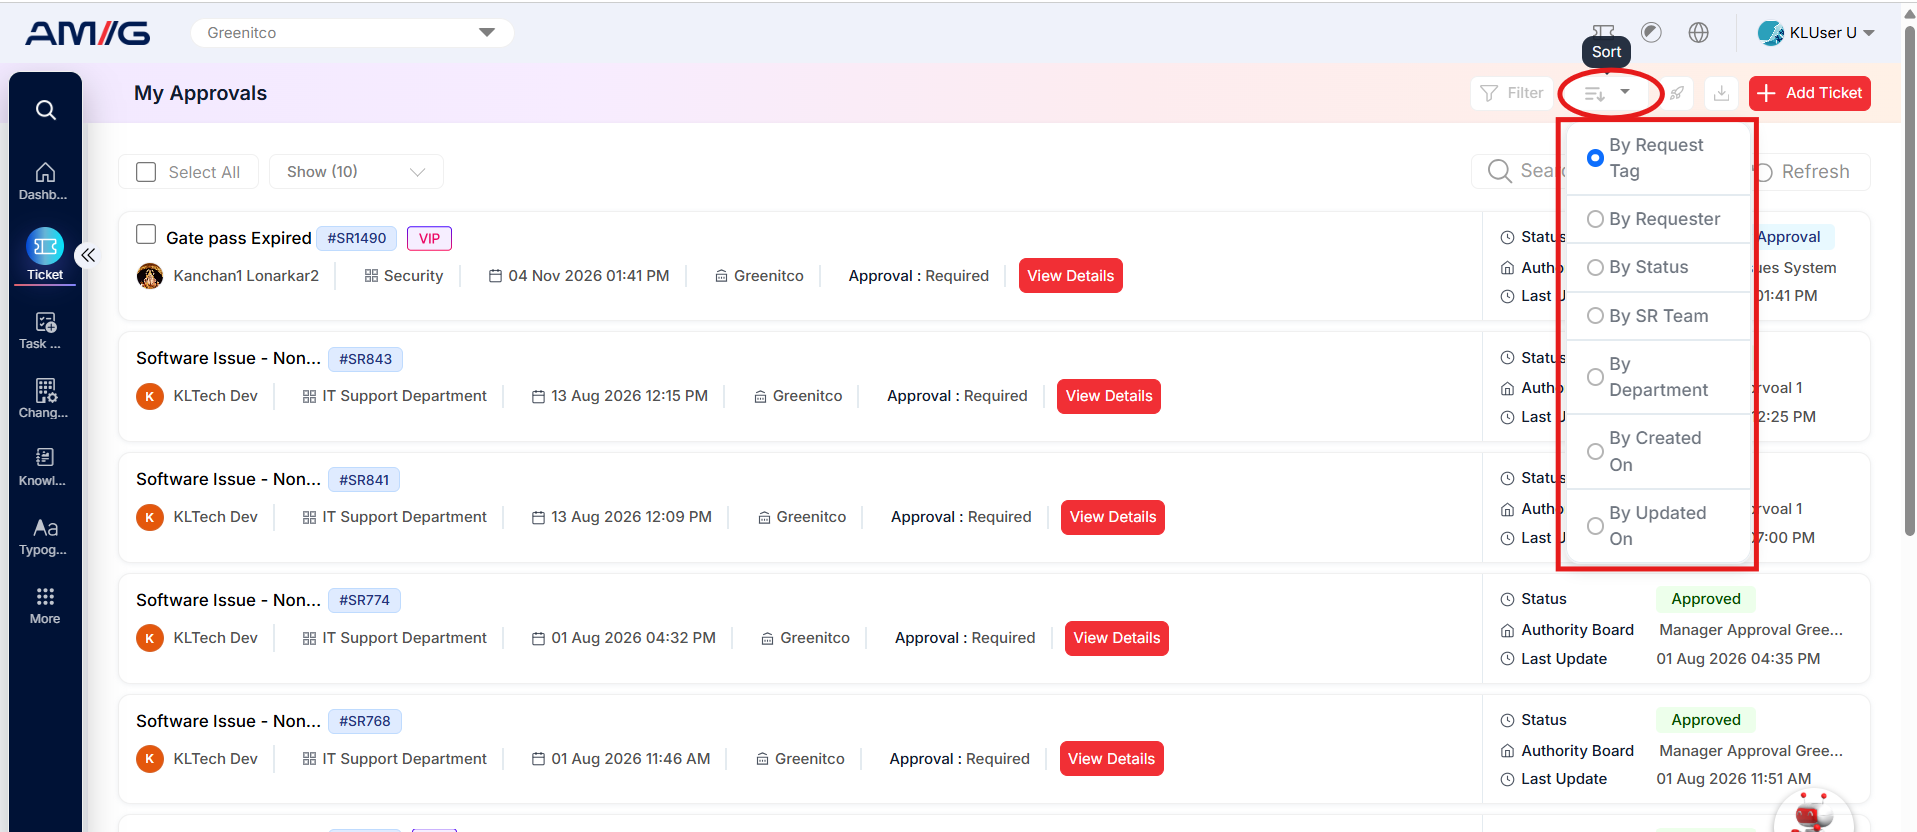
Figure: Ticket sorting fields
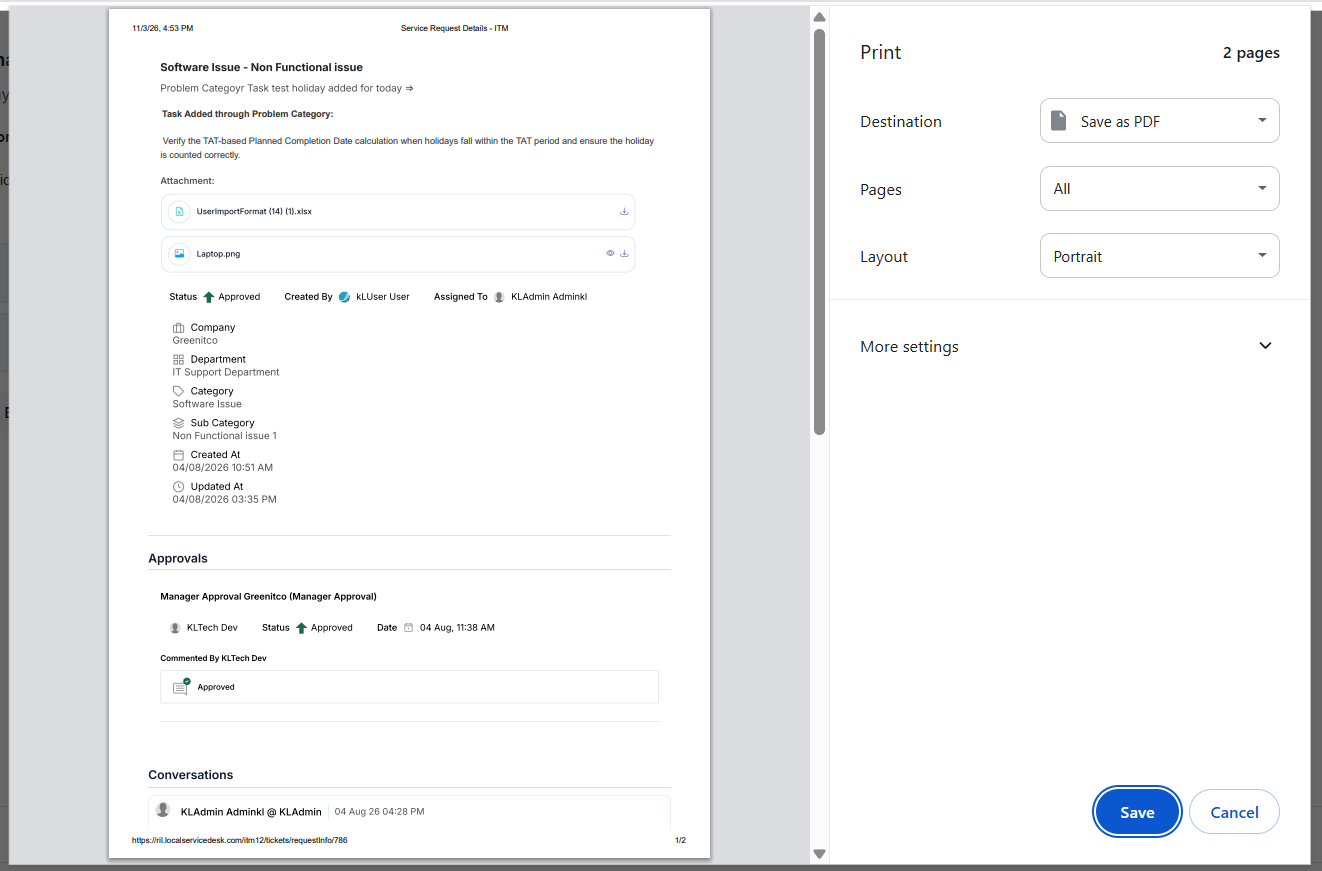
Print Service Requests
Step 1: Open the Service Request Details page and click the Print option.
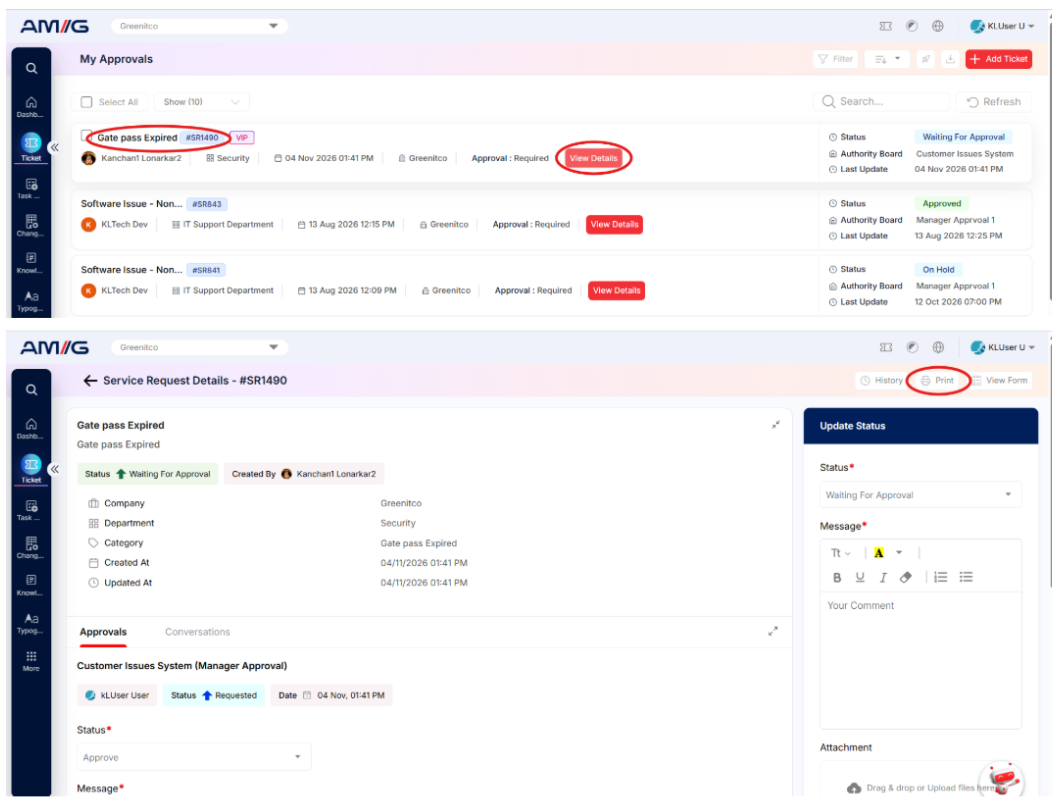 Step 2: The Print Preview window will appear, displaying the service request details.
Step 3: Select the desired Destination, Pages, and Layout options.
Step 4: Expand More Settings to configure additional print preferences, if required.
Step 5: Click Save to save the service request as a PDF or proceed with printing based on the selected destination. Click Cancel to close the print preview.
View Dynamic Form
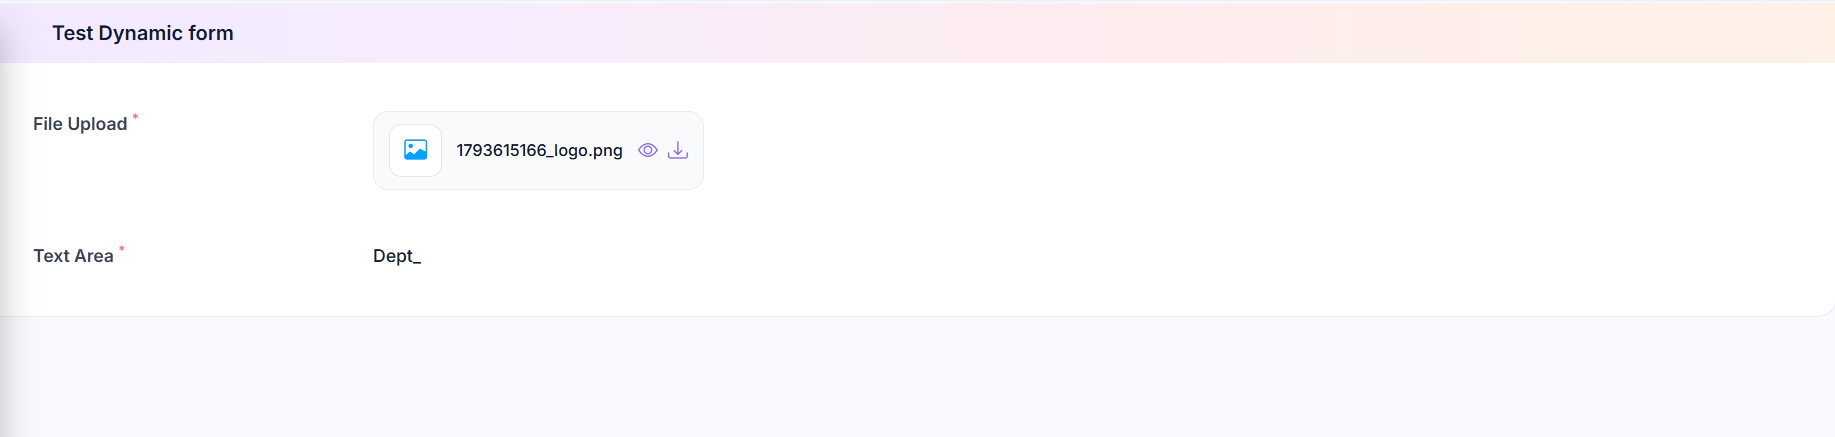
If a Dynamic Form is configured for the selected Problem Category, it will be available on the Service Request Details page after creating the Service Request. You can view the configured form and its details using the View Form option.
Step 1: Open the Service Request Details page and click the View Form button.
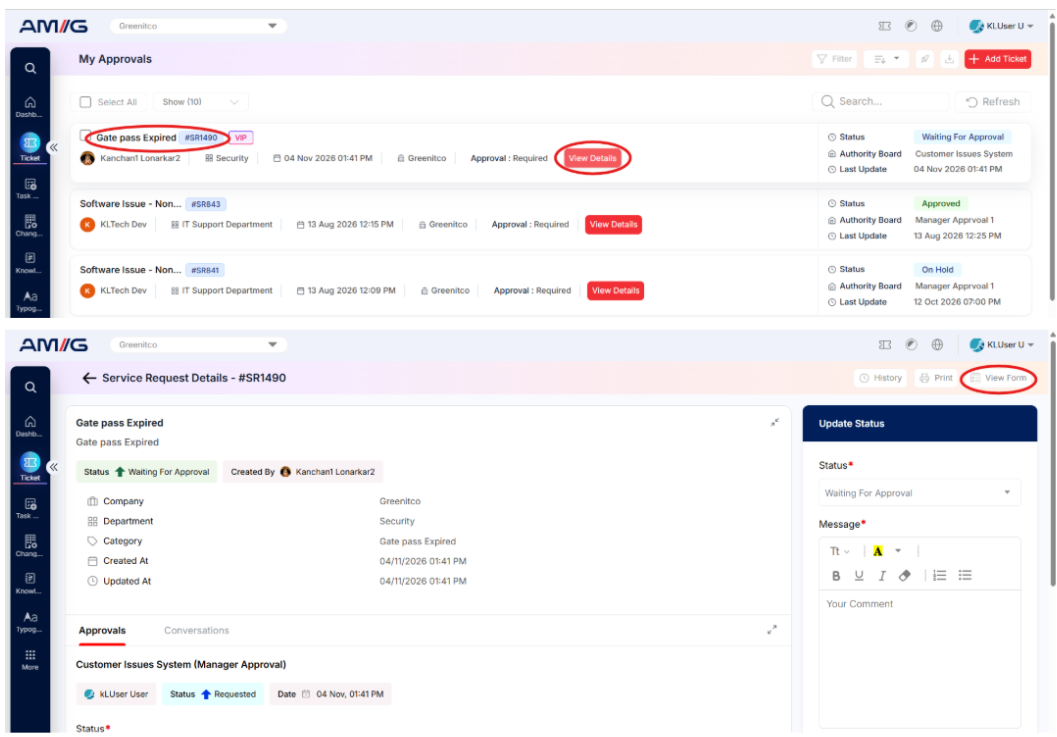 Step 2: The Dynamic Form will open, displaying the configured form fields and their respective details.