How to check in a Device?
When an employee leaves the company, or the device is not functioning properly, check in happens. Check-in means, the asset is in your possession, or potentially out for repair. It is up to you to decide what status to assign it, based on the current state of the asset.
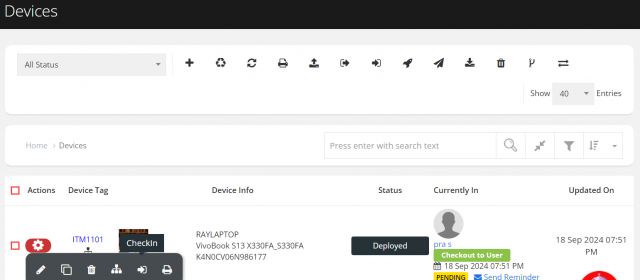
To Checkin a device
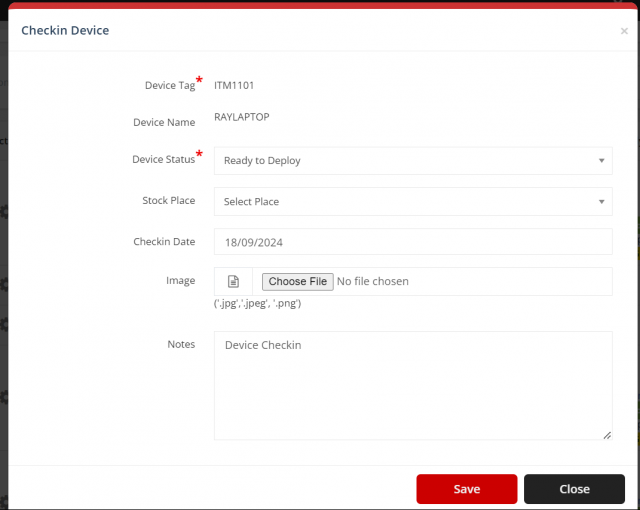
Go to the left sidebar and select Devices > Device Details >Click on the action control of the particular device > Click on the sign-in icon > Add the Details > Click on Save.
While check in the device, it is necessary to update the correct status of the device. Some possible statuses are as follows
- Archived - This asset will only show up in the Archived view. You cannot assign this to anyone
- Broken/Not fixable - This asset will only show up in the broken/not fixable view and it is undeployable
- Lost/Stolen - This asset will only show up in the lost/stolen and it is undeployable
- Out for diagnostics - This asset will only show up in the out for diagnostics and it is undeployable
- Out for repair - This asset will only show up in the out for repair and it is undeployable
- Pending - This asset is unable to use now (awaiting software installs, out for repair) and it is undeployable
- Ready for use - This asset is ready to use and it is deployable (You can assign this to anyone)
- Scrap- Discarded or removed and it is undeployable
To retrieve multiple an device at a time, refer device bulk checkin. (Click at section)


We are continuously improving our documentation to ensure it meets your needs. This document will be updated regularly, so please check back for the latest information. If you have any questions or encounter any issues, feel free to reach out to us at support@itassetmanagement.in.