

Introduction
The status shows where a ticket is in its lifecycle, for example Open, In Progress, On Hold or Resolved. The statuses, their colours and whether the TAT pauses in a status are set by your administrator. You change the status with the Status Update form, which is visible only when the ticket is assigned to you.
Step 1: Open the ticket and find the Status Update form in the right-side panel.
Step 2: Select the new status from the Ticket Status drop-down. The options can depend on the ticket type.
Step 3: If your role allows it, update the Priority and TAT to reflect the current situation.
Step 4: Enter a comment describing the progress, the action taken or what you are waiting for. Attach files if needed.
Step 5: Select Internal Note if the update is for technicians only, and use CC Notification to inform additional recipients.
Step 6: Click Update. The status changes, the comment is added to the conversation, and the user is notified according to the notification settings.
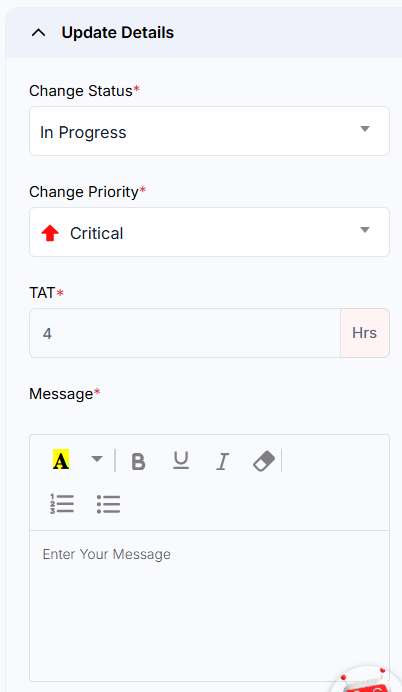
Figure 2.2.13: Status Update form
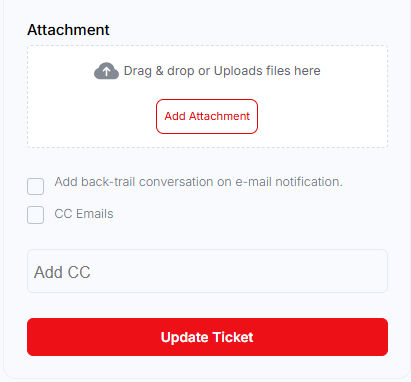
Figure 2.2.14: Status Update form – attachments, notification options and Update Ticket
Note: Priority and TAT can be edited only if your access is enabled in the Ticket Handler Limit section of ticket configuration. Some status changes need approval before they take effect (see section 2.7.4).
What Happens After You Resolve a Ticket?
- The user is notified and can provide feedback.
- Resolved tickets are automatically closed after three days.
- Closed tickets are archived after the number of days configured by your administrator.
- Resolved tickets can be converted into knowledge documents.